I was working on a requirement where i have to clone records on multiple custom entities.if the entity having very less fields, you can achieve it easily but what about those entities where attributes are more than 100 per entity. So, i am going to tell you how you can achieve it easily by writing a very small code.
Lets start!
Step-1: Add a button “Clone” using the ribbon workbench on your entity where you want to perform the cloning. Just drag and drop where you want to add.
Now create a command and add an java script action.
Add java script library and function name(code added below). Add a “Crm Parameter= PrimaryControl”.
After that add the command to the button. Publish the solution from ribbon workbench.
Step-2: Now create a global Action process inside your dynamics solution.and create a input parameter of “Entity” type .
we are going to set it through our java script code as below. So while setting the entity type parameter inside the action, we need to specify two properties , 1) GUID of the record , 2) Logical name in key value pair.
Note: Value you can get easily but how you can make “key” dynamic so that it could run on any custom entity. for that you need to pass the key dynamically as shown in below code(check InvokeAction function parameter).
function callAction(primaryControl) {
    debugger;
    var formContext=primaryControl;
    var formtype = formContext.ui.getFormType();
    if(formtype!=1){
    debugger;
    Xrm.Utility.confirmDialog("Do You want Clone this Record?",
    function () {
     var recordId = formContext.data.entity.getId().replace("{", "").replace("}", "");
     var logicalName = formContext.data.entity.getEntityName();
    InvokeAction(recordId,logicalName);
    },
    function () {});

    }
   }
   function InvokeAction(recordId,logicalName) {
    debugger;
    var parameters = {};
var target = {};
target[logicalName+"id"]=recordId;      //making it dynamics so can be worked on multiple entity
target["@odata.type"] = "Microsoft.Dynamics.CRM."+logicalName;
parameters.Target = target;

var ign_CloneRecordRequest = {
    Target: parameters.Target,

    getMetadata: function() {
        return {
            boundParameter: null,
            parameterTypes: {
                "Target": {
                    "typeName": "mscrm.crmbaseentity",
                    "structuralProperty": 5
                }
            },
            operationType: 0,
            operationName: "ign_CloneRecord"            //specify your action name
        };
    }
};

Xrm.WebApi.online.execute(ign_CloneRecordRequest).then(
    function success(result) {
        if (result.ok) {
            //Success - No Return Data - Do Something
        }
    },
    function(error) {
        Xrm.Utility.alertDialog(error.message);
    }
);

   }
Step-3:After that you need to create a plugin which will create a clone/copy of the record.
using System;
using System.Collections.Generic;
using System.Linq;
using System.Text;
using System.Threading.Tasks;
using Microsoft.Xrm.Sdk;
using Microsoft.Xrm.Sdk.Query;
using Microsoft.Crm.Sdk.Messages;

namespace cloneRecord
{
    public class cloneRecord : IPlugin
    {
        public void Execute(IServiceProvider serviceProvider)
        {

            IPluginExecutionContext context = (IPluginExecutionContext)serviceProvider.GetService(typeof(IPluginExecutionContext));
            ITracingService tracing = (ITracingService)serviceProvider.GetService(typeof(ITracingService));
            IOrganizationServiceFactory servicefactory = (IOrganizationServiceFactory)serviceProvider.GetService(typeof(IOrganizationServiceFactory));
            IOrganizationService service = servicefactory.CreateOrganizationService(context.UserId);
            tracing.Trace(context.InputParameters.Contains("Target").ToString());
            if (context.InputParameters.Contains("Target") && context.InputParameters["Target"] is Entity)
            {
                if(context.Depth>1)
                {
                    return;
                }
                //Getting the Entity record from the Action
                Entity en = (Entity)context.InputParameters["Target"];
                //Retrieving the same entity record with all the attributes
                Entity entity= service.Retrieve(en.LogicalName, en.Id, new ColumnSet(true));
                //Set the EntityState to null, so that a new cloned record can be created
                entity.EntityState = null;
                //remove the PrimaryId of the record otherwise will show you error
                entity.Attributes.Remove(entity.LogicalName+"id") ;

                if(entity.Contains("new_name") && (string)entity.Attributes["new_name"]!=string.Empty)
                {
                    //differentiating the new record which will create from the exisiting with New prefix.
                    entity.Attributes["name"] = "New " + entity.Attributes["name"].ToString();
                }

                //set a unique id to the cloned record
                entity.Id = Guid.NewGuid();

                //Create the new cloned record
                service.Create(entity);
            }
            }
    }
}
Now register your plugin and use the global action as message inside your plugin step.
Now navigate to custom entity in dynamics model driven app. As you can see here my clone button just click on it.
Now go back to the Entity list record and you will found copied/cloned record as below image. If you want to do cloning of record more than one entity, just follow only the Step-1 as shown above, it will work for any entity.
That’s it.
Hope this will help you. If you having any issues please feel free to ask me . Shoot your question in comment box.
Today i will walk through how we can setup our code inside Azure DevOps Repository.
Prerequisite:
1.Azure DevOps Subscription
2.Visual Studio 2015/17/19
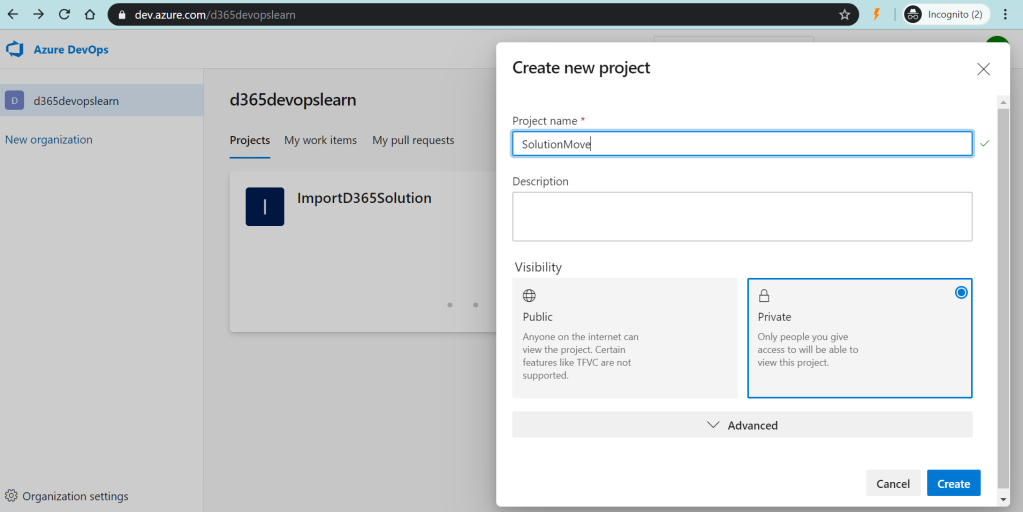
Login to dev.azure.com. It will prompt you to create an organisation, give a proper name. I am using “d365devopslearn”.
Now you need to click on New Project. once you click on new project you will see a new window as below:
Give proper project name , i am using “Solution Move”. You can set the visibility as per the requirement , as I am setting “Private” and click on Create.
Now your DevOps project is setup. Now add your Repository here by clicking Repos as shown below:
Now you need to connect with your source code, for that we have different ways to connect. I am connecting locally from my system , for that select Clone in Visual Studio as shown below:
It will open VS as shown below. Once you click on Connect it will prompt you to enter organisation credentials.
Once it is connected , you can create your Solution and add your code in it.
Here I just added simple .net class library file for testing. Now to see the changed code you need to click on pen like image seen below right corner .After that you can Commit All and Push the changes to DevOps Repository.
Once the code is committed and pushed it will shows as below:
Now you can see all the changes made to your code into DevOps Repos. As you can see below 🙂
For any questions feel free to ask in comment box.
Hello , Hope Everyone doing very well. i want to share something which a created for you guys. i was working on a requirement where i need to get logged in user security role.Most of you will already know but i discover a new method,a very short code without using any web API . This will help you to save your time to writ a big code.
function getCurrentUserSecurityRoles(executionContext)
{
	//Returns information about the current user settings.
    var userRoles=Xrm.Utility.getGlobalContext().userSettings;
	//it will give you count of security a user is having
    if(Object.keys(userRoles.roles._collection).length>0)
    {
		//userRoles.roles._collection will give you the index of the Current user security role , it contains roleid , and name of the security role
        for ( var rolidcollection in userRoles.roles._collection)
        {
			//Once you get the index of the security role from where you can retrive id, name of the Security Role
           var currentUserRoles= Xrm.Utility.getGlobalContext().userSettings.roles._collection[rolidcollection].name;
           console.log(currentUserRoles);
        }
    }
}
Sometimes you need to switch a BPF based on some option set value. e.g. if I have an option set field named “Active BPF” in which I have one or more values. Based upon those values, going to switch BPF instance. Below are the trigger points.
On creation of the case entity record.
On update of an option set field on case entity form.
To achieve this functionality without using single line of code going to use Power Automate CDS Current Environment Connector. There is no solution available for achieving this functionality using Power Automate previously until I developed one. I am sharing my knowledge by which you can achieve the functionality using Power Automate.
Left pane you will found list of operation you can perform. Now click on Flows. Click on “+New” button and select Automated-from blank Flow.
Then give a proper name and select from the list of the trigger points available-Common Data Service Current Environment.
Trigger: – Create and Update of the Case Entity.
In filter attribute you can specify attribute as a part of trigger. e.g. Change of that attribute flow will run.
When a user clicks on create “+New” a new case entity record. Default BPF set to the record.
If there are 4 BPF active for case entity than based on their order, default BPF set (Top Order).
For setting a new BPF instance you need to delete or make it inactive. In this scenario I am deleting the default BPF instance and setting a new one.
Here Immigration BPF is default BPF. For Setting a new BPF (PWD Business Process Flow), need to delete existing or default BPF Instance.
Now let get back to the Flow. Now after the triggering point check the BPF option set value is null or not.
If it is not null,
check the value of the option set, suppose it is PWD BPF value 364840000, then delete the existing or default BPF (Immigration Business Process). For deleting the existing flow instance, need to perform several steps.
Get the process using List record CDS current environment action and add filter criteria (name eq ‘Immigration Business Process).
List records give you the collection of the record for get the all the data from the collection further we need to iterate the list of records using apply for each control. We need to get the instance of the Immigration Business Process Entity. Again, use the list record CDS Current Environment for getting the immigration business process flow entity instance record using filter query.
In the filter query “_bpf_incidentid_value” is an attribute in Immigration Business Process Entity, reference to the case record and processed/workflowid is Immigration Business Process Flow GUID. Set both values in filter attribute, now you have the record in response. Again, add apply for each control and add delete action of common data service current environment. Specify the entity name and item id is immigration business process entity instance record id.
After deletion of the default or existing process half of the task completed now we need to create the instance of the other business process – PWD Business Process.
Here I am checking the “Active BPF” option set value in Case entity form using switch case condition.
Specify your Option set value.
Check the option set value is Posted Worker-36484000. If it matches than we need to follow some steps to create an instance of the flow and set it to case.
List record process using CDS current environment Action and add filter query name eq ‘PWD Business Process’.
Add apply for each and now we need the process stages of the PWD Business Process. Because while creating new PWD Business Process instance record we need to specify the active stage. In this scenario I am retrieving first Process Stage using filter query. In filter query I am filtering it based on process id which is PWD Business Process Guid and stage name is Case Validation (First stage in PWD BPF).
So now I have process stage. Next, create PWD Business Process Instance.
Add a Apply for each condition it will give me the process stage entity record which I retrieved in previously. Inside it add an action “Create a Record” using CDS Current Environment. Specify the parameter as below.
Processstages – Plural name of the entity and parameter will be entity guid which I am retrieving from the previous list record Process stages.
3.Incident (Cases) – /incidents(incidentid)
Incidents – Plural name of the case entity and parameter will be entity guid which I am retrieving from the trigger record.
4.Process (Processes)-/workflows(workflowid) pass the PWD BPF Guid.
5.Status Reason- Make status reason active.
It will create an instance of the PWD Business Process and set it to active. After that you need to update the case entity record.
Select the new Action from the Common Data Service Current Environment- Update a Record. Give the entity name and the item id(from the trigger event), update the process id field by passing the PWD Business Process Instance Guid which created in previous step.
After that just terminate the flow.
Follow all the steps and you will be able to switch the BPF using Power Automate Common Data Service Current Environment Connector.
DevOps is very vast, we can perform n number of automation but today i will be focusing on import and export Dynamics 365 solution using Azure DevOps CI/CD Pipeline.This blog article is going to be bit longer because we have a lots of step, so guys bear with me and read it thoroughly you will get answer of your questions. We have lots of trigger where we can call our build and release, for your reference https://docs.microsoft.com/en-us/azure/devops/pipelines/build/triggers?view=azure-devops. Also you can call your Pipeline events from Power Automate. I would not go deep into it.
Prerequisite:
1.Azure Pipeline subscription.
2.Dynamics 365 Customer Engagement Online.
In previous blog ,I have explained you how to setup repository, next we are going to use that repository for exporting our solution.
Create a folder inside your repository where you can keep solution after the solution is exported.
Give a proper name , I am using “Dynamics365Solution”. You can not create empty folder so i just created an text file with the same name.
Once file is created click on commit changes for saving the file in DevOps repository.
Once the folder added we are going create Variable groups for storing connection string(which will be used while make connection do Dynamics 365 CE Online for export and import of the solution).It is a good practice for storing connection string inside the Variable group. Go to Library then click on +Variable group.
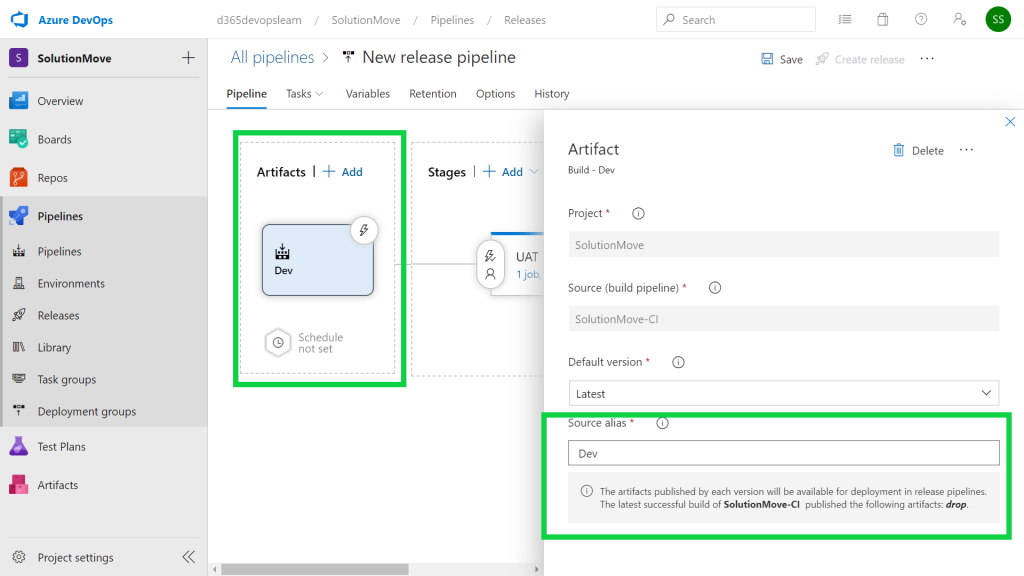
Now give variable group a name. I will assume you got a Dev and a UAT environment. The package from the build automation blog will be deployed to these environments.So, we will create two connection string for the Dev and UAT environments.
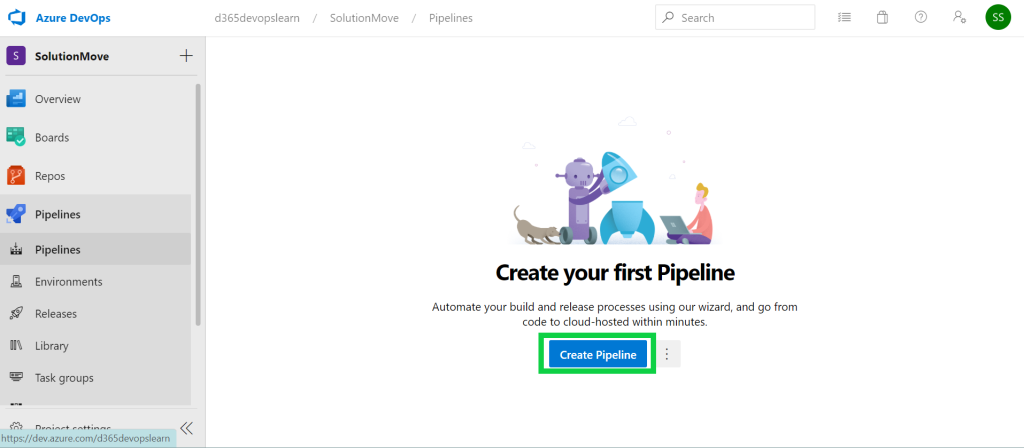
After that we need to create a build pipeline. Navigate to Pipeline->Create Pipeline.
We are using Azure Repos Git as a source , after that choose your Team project and repository where you want to perform your pipeline operation. Specify your branch for your build , using master for the demonstration.
After that choose your template, but currently we do not have template for Dynamics 365 so we are going to use Empty job.
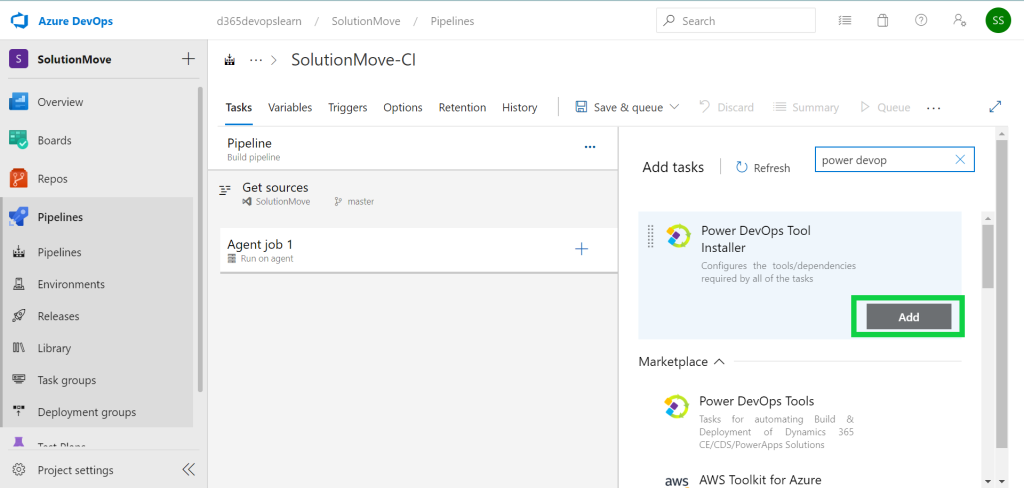
Microsoft provided job Agents which give you more control to install dependent software needed for your builds and deployment. For exporting solution we need to add three task.
First, search for the Power DevOps Tool Installer(it will copy all the tools to agent, optimize the process) by Wael Hamze.
Second, we are going to add Export Solution in similar way we added installer. Once it is added we need to specify three parameter. We already created in variable groups so lets utilize those connection string.
We need to link Variable group within pipeline, navigate to Variables click on link Variable group.
Choose your variable group, we are using “Dev Credential” here. Click on link. Because first we are going to export solution from our Dev environment.
Now First pass the Connection string. Second, the Name of your solution which you want to export, My solution Name is “DevopsExport”. Third you need to specify the output path.Click on … for browse and select the path which we created a folder inside the repository on start of our blog which was “Dynamics365Solution” .
You have lots of option in Additional setting of the Export Solution. Which you can add based on your requirement.
Once we exported the solution we need to publish it as an artifact. Add third task “Publish Artifact”. You can give a name to Artifact and need to specify the path same as your exported folder. After that click on Save & Queue.
it will open a window where you can give comments and other settings, Click on Save and Run.
It will take some seconds or minute to export and publish artifact based on your solution size.As you can see in below image Agent job run successfully and it produced 1 artifact. you can click on that link and navigate to the exported solution.
Now we need create a release pipeline for importing the solution in UAT environment. Navigate to the Release click on New pipeline.
Click on Empty job template.
Here we can add multiple stages. But i am using only one stage for this demonstration which is UAT. After giving stage name close it from X on right corner.
Now we need to add Artifact which we produced in the last build pipeline. Choose Project, Source(from Build Pipeline which is SolutionMove-CI), Build Version(using the latest, you can have multiple build, but here you need to select which build you want use for the release),Source Alias(by default it will take based on source, renamed it as Dev)
Again link your UAT credential with your pipeline using Variable group.
After linking,Now we need to add Task(select your stage where you want to add task if you have multiple stages it will show you when you will click on Task button), so i have on one stage which is UAT so just click on it.
Add “Power DevOps Tool Installer” and “Import Solution“. Specify the connection string and solution file location(browse to artifact folder where the solution is exported and select the solution Zip File). Below you can see other operation which you can perform when import will take place. Just click on save. After that Create release button will not be read only.you can click on it.
It will open window which is shown in below image. Select the stage and click on create.
Once release is created , we need to deploy it. Navigate to the +Deploy button, we can deploy current stage as well as multiple stage at a time. It will open one more window where you can give your comment and click on Deploy button.
It will take few second to deploy your solution into UAT environment, on successful deployment it will show you a Succeeded status.
That’s it. Now you can go to the UAT environment and check your solution.
Hope you all able to understand it. if you have any question feel free to reach out to me. Ping me in comment box if you have any query.
Hello Everyone, Today i would like to share my knowledge regarding show and hide ribbon button based on the user Security roles.
I have a custom entity name as “account1”. I have to create two button (Submit, Complete) using ribbon workbench.We have two type of user one is Salesperson, second one Sales Manager. So in this blog i am going to cover some of the points as given below.
1.If user security role is Salesperson, show “Submit” button and hide the “Complete” button.
2.If user security role is Sales Manager, show “Complete” button and hide the “Submit” button.
3.After creation of the record user will able to see the buttons(Submit or Complete).
Lets start.
I created a solution named as AccounRibbon and added my entity account1. Import the latest ribbon workbench into your organisation if already not done. Once it is imported successfully, open the the ribbon workbench and select your solution, i am selecting the Account Ribbon.
Once your solution loaded successfully,select the entity and add the buttons in to main form by drag and drop. Give the proper names to buttons.
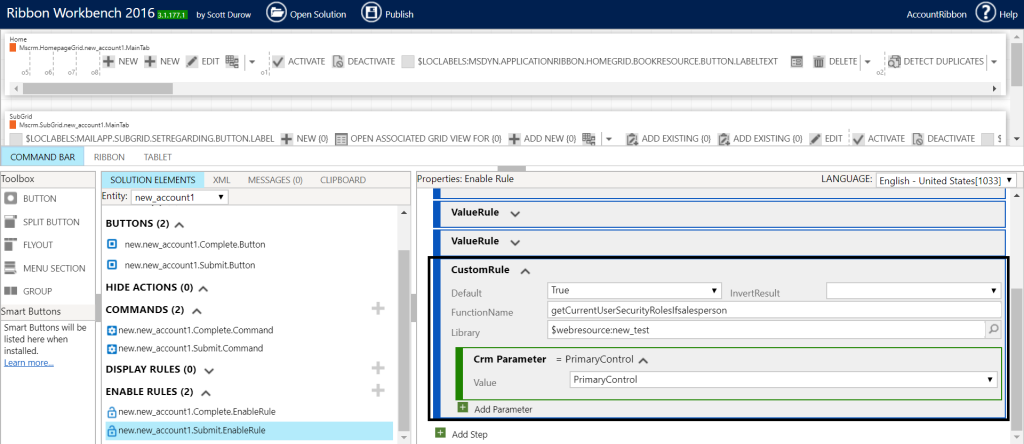
once button added we need to add the command and the enable rules for both the buttons.
Lets first talk about the Enable Rules.In Simple words, Enable rule are used as trigger when our buttons will enable for form.So first we need to check both the button will available only when the form type is update, for that we are going to use form state rule.
Click on the Submit Enable rule as shown in above screenshot, on the right panel , click on add step and choose FormStateRule.
Use existing because we want show this button after the record is created. Set invert rule as true, it means if the form is not “Existing” type then button will hide automatically. Same step follow for the Completed Enable rule. once both is done , now we have to write a CustomRule that will check the user security role and based on the user security role we will return true or false from the function.
NOTE:Please don’t focus on the other two ValueRule i am doing some other calculation as well that is not part of the this blog.
create a web resource and add this JS in your web resource.
function getCurrentUserSecurityRolesIfsalesperson()
{
    debugger;
    var value=false;
    var userRoles=Xrm.Utility.getGlobalContext().userSettings;
    if(Object.keys(userRoles.roles._collection).length>0)
    {
        for ( var rolidcollection in userRoles.roles._collection)
        {
           var currentUserRoles= Xrm.Utility.getGlobalContext().userSettings.roles._collection[rolidcollection].name;
           if(currentUserRoles.toLowerCase()=="salesperson")
           {
               value=true;
               break;
           }
        }
    }
    return value;
}
After adding this JS publish the web resource and go back to the ribbon workbench.
Add new Step in Enable rule and select custom rule. Specify the property as shown in image.
This is completed for one button submit repeat the same process for complete button do necessary changes.e.g match with sales manager role like i am matching with salesperson.
Now you have both the enable rule done. Add both the enable rule to respected command as shown in below image.
Once it is added. you can specify the action-> what you want to perform after click on button. as given in the snap. Perform the same steps for the Complete command as well. Now go to the button tab select the button and add the command respected to your button.
Once the command added , perform same operation for the Submit button.then click on publish.
Once you follow all the steps you will easily achieve what i shared in blog.
Thanks for seeing. Hope you like it. If you have any query please use comment box.
I got a task to send an email to the customer(contact), in which I have to send a quote to the customer as a pdf attachment. But every quoted line contains lots of images as note attachment those also should come in pdf and after creating the Report, attach to an email and then sent to the customer. All I have to do dynamic on click of a button. So I am sharing my learning how I did it.
I am creating a blog on how to send an email attachment to the customer. Hope it will you guys.
Part 1:
Creating Email activity with attachment(SSRS pdf report). Also adding the user Signature with the email.
var base64 = null;

function form_onsave(executionContext) {
    debugger;
    var formContext = executionContext.getFormContext();
    if (formContext.getAttribute("ccc_senttocustomer") !== null && formContext.getAttribute("ccc_senttocustomer") !== undefined) {
        var senttocustomer = formContext.getAttribute("ccc_senttocustomer").getValue();
        if (senttocustomer === true) {
            createAttachment();
        }
    }
}
function getReportingSession() {
    var reportName = "Estimate.rdl"; //set this to the report you are trying to download
    //var reportGuid = "170faa66-19ad-e811-a96f-000d3af43d1a"; //set this to the guid of the report you are trying to download
    var reportGuid = "75cdd688-8bbd-e811-a971-000d3af42a5a"; //set this to the guid of the report you are trying to download
    var rptPathString = ""; //set this to the CRMF_Filtered parameter
    var selectedIds = Xrm.Page.data.entity.getId();
    var pth = Xrm.Page.context.getClientUrl() + "/CRMReports/rsviewer/reportviewer.aspx";
    var retrieveEntityReq = new XMLHttpRequest();

    var strParameterXML = "<fetch version='1.0' output-format='xml-platform' mapping='logical' distinct='false'><entity name='quote'><all-attributes /><filter type='and'><condition attribute='quoteid' operator='eq' value='" + selectedIds + "' /> </filter></entity></fetch>";

    retrieveEntityReq.open("POST", pth, false);

    retrieveEntityReq.setRequestHeader("Accept", "*/*");

    retrieveEntityReq.setRequestHeader("Content-Type", "application/x-www-form-urlencoded");

    retrieveEntityReq.send("id=%7B" + reportGuid + "%7D&uniquename=" + Xrm.Page.context.getOrgUniqueName() + "&iscustomreport=true&reportnameonsrs=&reportName=" + reportName + "&isScheduledReport=false&p:CRM_quote=" + strParameterXML);
    var x = retrieveEntityReq.responseText.lastIndexOf("ReportSession=");
    var y = retrieveEntityReq.responseText.lastIndexOf("ControlID=");
    // alert("x" + x + "y" + y);
    var ret = new Array();

    ret[0] = retrieveEntityReq.responseText.substr(x + 14, 24);
    ret[1] = retrieveEntityReq.responseText.substr(x + 10, 32);
    return ret;
}

function createEntity(ent, entName, upd) {
    var jsonEntity = JSON.stringify(ent);
    var createEntityReq = new XMLHttpRequest();
    var ODataPath = Xrm.Page.context.getClientUrl() + "/XRMServices/2011/OrganizationData.svc";
    createEntityReq.open("POST", ODataPath + "/" + entName + "Set" + upd, false);
    createEntityReq.setRequestHeader("Accept", "application/json");
    createEntityReq.setRequestHeader("Content-Type", "application/json; charset=utf-8");
    createEntityReq.send(jsonEntity);
    var newEntity = JSON.parse(createEntityReq.responseText).d;

    return newEntity;
}

function createAttachment() {
    var params = getReportingSession();

    if (msieversion() >= 1) {
        encodePdf_IEOnly(params);
    } else {
        encodePdf(params);
    }
}

var StringMaker = function () {
    this.parts = [];
    this.length = 0;
    this.append = function (s) {
        this.parts.push(s);
        this.length += s.length;
    }
    this.prepend = function (s) {
        this.parts.unshift(s);
        this.length += s.length;
    }
    this.toString = function () {
        return this.parts.join('');
    }
}

var keyStr = "ABCDEFGHIJKLMNOPQRSTUVWXYZabcdefghijklmnopqrstuvwxyz0123456789+/=";

function encode64(input) {
    var output = new StringMaker();
    var chr1, chr2, chr3;
    var enc1, enc2, enc3, enc4;
    var i = 0;

    while (i < input.length) {
        chr1 = input[i++];
        chr2 = input[i++];
        chr3 = input[i++];

        enc1 = chr1 >> 2;
        enc2 = ((chr1 & 3) << 4) | (chr2 >> 4);
        enc3 = ((chr2 & 15) << 2) | (chr3 >> 6);
        enc4 = chr3 & 63;

        if (isNaN(chr2)) {
            enc3 = enc4 = 64;
        } else if (isNaN(chr3)) {
            enc4 = 64;
        }

        output.append(keyStr.charAt(enc1) + keyStr.charAt(enc2) + keyStr.charAt(enc3) + keyStr.charAt(enc4));
    }

    return output.toString();
}

function encodePdf_IEOnly(params) {
    var bdy = new Array();
    var retrieveEntityReq = new XMLHttpRequest();

    var pth = Xrm.Page.context.getClientUrl() + "/Reserved.ReportViewerWebControl.axd?ReportSession=" + params[0] + "&Culture=1033&CultureOverrides=True&UICulture=1033&UICultureOverrides=True&ReportStack=1&ControlID=" + params[1] + "&OpType=Export&FileName=Public&ContentDisposition=OnlyHtmlInline&Format=PDF";
    retrieveEntityReq.open("GET", pth, false);
    retrieveEntityReq.setRequestHeader("Accept", "*/*");

    retrieveEntityReq.send();
    bdy = new VBArray(retrieveEntityReq.responseBody).toArray(); // minimum IE9 required

    createNotesAttachment(encode64(bdy));
}

function encodePdf(params) {
    var xhr = new XMLHttpRequest();
    var pth = Xrm.Page.context.getClientUrl() + "/Reserved.ReportViewerWebControl.axd?ReportSession=" + params[0] + "&Culture=1033&CultureOverrides=True&UICulture=1033&UICultureOverrides=True&ReportStack=1&ControlID=" + params[1] + "&OpType=Export&FileName=Public&ContentDisposition=OnlyHtmlInline&Format=PDF";
    xhr.open('GET', pth, true);
    xhr.responseType = 'arraybuffer';

    xhr.onload = function (e) {
        if (this.status == 200) {
            var uInt8Array = new Uint8Array(this.response);
            base64 = encode64(uInt8Array);
            CreateEmail(base64);
            createNotesAttachment(base64);
        }
    };
    xhr.send();
}

function msieversion() {

    var ua = window.navigator.userAgent;
    var msie = ua.indexOf("MSIE ");

    if (msie > 0 || !!navigator.userAgent.match(/Trident.*rv\:11\./))      // If Internet Explorer, return version number
        return parseInt(ua.substring(msie + 5, ua.indexOf(".", msie)));
    else                 // If another browser, return 0
        return 0;
}

function createNotesAttachment(base64data) {

    var propertyName;
    var propertyAddress;
    var propertyCity;
    var estimateNumber;
    if (Xrm.Page.getAttribute("name") !== null && Xrm.Page.getAttribute("name") !== undefined) {
        estimateNumber = Xrm.Page.getAttribute("name").getValue();
        //alert(estimateNumber);
    }
    if (Xrm.Page.getAttribute("ccc_propertyid") !== null && Xrm.Page.getAttribute("ccc_propertyid") !== undefined) {
        var propertyNameRef = Xrm.Page.getAttribute("ccc_propertyid");
        if (propertyNameRef != null && propertyNameRef != undefined) {
            propertyId = propertyNameRef.getValue()[0].id.slice(1, -1);
            propertyAddress = propertyNameRef.getValue()[0].name;
            var object = getPropertyAddress(propertyId);
            propertyName = object[1];
            propertyCity = object[2];
        }
    }

    var post = Object();
    post.DocumentBody = base64data;
    post.Subject = estimateNumber+propertyAddress;
    post.FileName = estimateNumber + "-" + propertyName + "-" + propertyAddress + "-" + propertyCity + ".pdf";
    post.MimeType = "application/pdf";
    post.ObjectId = Object();
    post.ObjectId.LogicalName = Xrm.Page.data.entity.getEntityName();
    post.ObjectId.Id = Xrm.Page.data.entity.getId();
    createEntity(post, "Annotation", "");
}

function CreateEmail(base64) {

    var recordURL;
    var propertyName;
    var propertyAddress;
    var propertyCity;
    var estimateNumber;
    var serverURL = Xrm.Page.context.getClientUrl();
    var email = {};
    var qid = Xrm.Page.data.entity.getId().replace(/[{}]/g, "");
    var OwnerLookup = Xrm.Page.getAttribute("ownerid").getValue();
    var OwnerGuid = OwnerLookup[0].id;
    OwnerGuid = OwnerGuid.replace(/[{}]/g, "");
    var ContactLookUp = Xrm.Page.getAttribute("ccc_contact").getValue();
    var ContactId = ContactLookUp[0].id.replace(/[{}]/g, "");
    var contactTypeName = ContactLookUp[0].typename;
    var contactName = ContactLookUp[0].name;
    var signature = getSignature(OwnerGuid);
    if (Xrm.Page.getAttribute("ccc_recordurl") !== null && Xrm.Page.getAttribute("ccc_recordurl") !== undefined) {
        recordURL = Xrm.Page.getAttribute("ccc_recordurl").getValue();
        //alert(estimateNumber);
    }
    if (Xrm.Page.getAttribute("name") !== null && Xrm.Page.getAttribute("name") !== undefined) {
        estimateNumber = Xrm.Page.getAttribute("name").getValue();
        //alert(estimateNumber);
    }
    if (Xrm.Page.getAttribute("ccc_propertyid") !== null && Xrm.Page.getAttribute("ccc_propertyid") !== undefined) {
        var propertyNameRef = Xrm.Page.getAttribute("ccc_propertyid");
        if (propertyNameRef != null && propertyNameRef != undefined) {
            propertyId = propertyNameRef.getValue()[0].id.slice(1, -1);
            propertyAddress = propertyNameRef.getValue()[0].name;
            var object = getPropertyAddress(propertyId);
            propertyName = object[1];
            propertyCity = object[2];
        }
    }

    if (signature == null || signature == undefined) {
        signature = "";
    }
    var string = "Hello " + contactName + " ,</br>Here is the estimate you requested for this location:</br>Estimate # " + estimateNumber + " </br>" + propertyName + "  " + propertyAddress + ",  " + propertyCity + "</br></br>A PDF copy is attached to this email, as well.</br>If you have any questions about this estimate, please reply back to this email or call me.Thank you for considering us!</br></br>" + signature;


    email["subject"] = estimateNumber +"-"+ propertyAddress;
    email["description"] = string;
    email["regardingobjectid_quote@odata.bind"] = "/quotes(" + qid + ")";
    //activityparty collection
    var activityparties = [];
    //from party
    var from = {};
    from["partyid_systemuser@odata.bind"] = "/systemusers(" + OwnerGuid + ")";
    from["participationtypemask"] = 1;
    //to party
    var to = {};
    to["partyid_contact@odata.bind"] = "/contacts(" + ContactId + ")";
    to["participationtypemask"] = 2;

    activityparties.push(to);
    activityparties.push(from);

    //set to and from to email
    email["email_activity_parties"] = activityparties;

    var req = new XMLHttpRequest();
    req.open("POST", Xrm.Page.context.getClientUrl() + "/api/data/v8.2/emails", false);
    req.setRequestHeader("OData-MaxVersion", "4.0");
    req.setRequestHeader("OData-Version", "4.0");
    req.setRequestHeader("Accept", "application/json");
    req.setRequestHeader("Content-Type", "application/json; charset=utf-8");
    req.onreadystatechange = function () {
        if (this.readyState === 4) {
            req.onreadystatechange = null;
            if (this.status === 204) {
                var uri = this.getResponseHeader("OData-EntityId");
                var regExp = /\(([^)]+)\)/;
                var matches = regExp.exec(uri);
                var newEntityId = matches[1];
                createEmailAttachment(newEntityId, base64);
            } else {
                Xrm.Utility.alertDialog(this.statusText);
            }
        }
    };
    req.send(JSON.stringify(email));
    ///////////////////
}
function createEmailAttachment(emailUri, base64) {
    var activityId = emailUri.replace(/[{}]/g, "");
    var propertyId;
    var propertyName;
    var propertyAddress;
    var propertyCity;
    var estimateNumber;
    if (Xrm.Page.getAttribute("name") !== null && Xrm.Page.getAttribute("name") !== undefined) {
        estimateNumber = Xrm.Page.getAttribute("name").getValue();
    }
    if (Xrm.Page.getAttribute("ccc_propertyid") !== null && Xrm.Page.getAttribute("ccc_propertyid") !== undefined) {
        var propertyNameRef = Xrm.Page.getAttribute("ccc_propertyid");
        if (propertyNameRef != null && propertyNameRef != undefined) {
            propertyId = propertyNameRef.getValue()[0].id.slice(1, -1);
            propertyAddress = propertyNameRef.getValue()[0].name;
            var object = getPropertyAddress(propertyId);
            propertyName = object[1];
            propertyCity = object[2];

        }
    }


    var activityType = "email"; //or any other entity type
    var entity = {};
    entity["objectid_activitypointer@odata.bind"] = "/activitypointers(" + activityId + ")";
    //entity.body = "ZGZnZA=="; //your file encoded with Base64
    entity.body = base64; //your file encoded with Base64
    entity.filename = estimateNumber + "-" + propertyName + "-" + propertyAddress + "-" + propertyCity + ".pdf";
    entity.subject = estimateNumber + "-" + propertyName;
    entity.objecttypecode = activityType;
    var req = new XMLHttpRequest();
    req.open("POST", Xrm.Page.context.getClientUrl() + "/api/data/v8.2/activitymimeattachments", false);
    req.setRequestHeader("OData-MaxVersion", "4.0");
    req.setRequestHeader("OData-Version", "4.0");
    req.setRequestHeader("Accept", "application/json");
    req.setRequestHeader("Content-Type", "application/json; charset=utf-8");
    req.onreadystatechange = function () {
        if (this.readyState === 4) {
            req.onreadystatechange = null;
            if (this.status === 204) {
                var uri = this.getResponseHeader("OData-EntityId");
                var regExp = /\(([^)]+)\)/;
                var matches = regExp.exec(uri);
                var newEntityId = matches[1];
                //alert("attachement created "+newEntityId);
            } else {
                Xrm.Utility.alertDialog(this.statusText);
            }
        }
    };
    req.send(JSON.stringify(entity));
}
function getPropertyAddress(pid) {
    debugger;
    var ccc_name;
    var ccc_property1;
    var ccc_propertycity;
    var req = new XMLHttpRequest();
    req.open("GET", Xrm.Page.context.getClientUrl() + "/api/data/v8.2/ccc_properties(" + pid + ")?$select=ccc_name,ccc_property1,ccc_propertycity", false);
    req.setRequestHeader("OData-MaxVersion", "4.0");
    req.setRequestHeader("OData-Version", "4.0");
    req.setRequestHeader("Accept", "application/json");
    req.setRequestHeader("Content-Type", "application/json; charset=utf-8");
    req.setRequestHeader("Prefer", "odata.include-annotations=\"*\"");
    req.onreadystatechange = function () {
        if (this.readyState === 4) {
            req.onreadystatechange = null;
            if (this.status === 200) {
                var result = JSON.parse(this.response);
                ccc_name = result["ccc_name"];
                ccc_property1 = result["ccc_property1"];
                ccc_propertycity = result["ccc_propertycity"];
            } else {
                Xrm.Utility.alertDialog(this.statusText);
            }
        }
    };
    req.send();
    return [ccc_name, ccc_property1, ccc_propertycity];
}
function getSignature(OwnerGuid) {
    debugger;
    var sig;
    var req = new XMLHttpRequest();
    req.open("GET", Xrm.Page.context.getClientUrl() + "/api/data/v8.2/emailsignatures?$select=presentationxml&$filter=_ownerid_value eq " + OwnerGuid, false);
    req.setRequestHeader("OData-MaxVersion", "4.0");
    req.setRequestHeader("OData-Version", "4.0");
    req.setRequestHeader("Accept", "application/json");
    req.setRequestHeader("Content-Type", "application/json; charset=utf-8");
    req.setRequestHeader("Prefer", "odata.include-annotations=\"*\"");
    req.onreadystatechange = function () {
        if (this.readyState === 4) {
            req.onreadystatechange = null;
            if (this.status === 200) {
                var results = JSON.parse(this.response);
                for (var i = 0; i < results.value.length; i++) {
                    var presentationxml = results.value[i]["presentationxml"];
                    oXml = CreateXmlDocument(presentationxml);
                    sig = oXml.lastChild.lastElementChild.textContent;
                }
            } else {
                Xrm.Utility.alertDialog(this.statusText);
            }
        }
    };
    req.send();
    return sig;
}
function CreateXmlDocument(signatureXmlStr) {
    // Function to create Xml formate of return email template data
    var parseXml;

    if (window.DOMParser) {
        parseXml = function (xmlStr) {
            return (new window.DOMParser()).parseFromString(xmlStr, "text/xml");
        };
    }
    else if (typeof window.ActiveXObject != "undefined" && new window.ActiveXObject("Microsoft.XMLDOM")) {
        parseXml = function (xmlStr) {
            var xmlDoc = new window.ActiveXObject("Microsoft.XMLDOM");
            xmlDoc.async = "false";
            xmlDoc.loadXML(xmlStr);

            return xmlDoc;
        };
    }
    else {
        parseXml = function () { return null; }
    }

    var xml = parseXml(signatureXmlStr);
    if (xml) {
        return xml;
    }
}
Part 2: Sending the email to customer using plugin.
using System;
using System.Collections.Generic;
using System.Linq;
using System.Text;
using System.Threading.Tasks;
using Microsoft.Xrm.Sdk.Workflow;
using System.Activities;
using Microsoft.Crm.Sdk.Messages;
using Microsoft.Xrm.Sdk;
namespace ccc_SendEmail
{
    public class sendEmail : CodeActivity
    {
        [RequiredArgument]
        [Input("RegardingEmail")]
        [ReferenceTarget("email")]
        public InArgument<EntityReference> RegardingEmail { get; set; }

        protected override void Execute(CodeActivityContext executionContext)
        {
            //Create the tracing service

            ITracingService tracingService = executionContext.GetExtension<ITracingService>();

            //Create the context
            IWorkflowContext context = executionContext.GetExtension<IWorkflowContext>();
            IOrganizationServiceFactory serviceFactory = executionContext.GetExtension<IOrganizationServiceFactory>();
            IOrganizationService service = serviceFactory.CreateOrganizationService(null);
            EntityReference emailRefrence = RegardingEmail.Get<EntityReference>(executionContext);

            SendEmailRequest SendEmail = new SendEmailRequest();

            SendEmail.EmailId = emailRefrence.Id;

            SendEmail.TrackingToken = "";

            SendEmail.IssueSend = true;

            SendEmailResponse res = (SendEmailResponse)service.Execute(SendEmail);
            //throw new NotImplementedException();
        }
    }
}
If need any help please use comment section so I can help you more. Thank you.
So before creating a plugin, You need to understand two things.
What is a Plugin?
When to use the Plugins?
1. What is a Plugin?
A plug-in is custom business logic(code) that you can integrate with Dynamics CRM to modify or augment the standard behavior of the platform.
In simple word, it is a piece of code used to enhance the ability to perform the task which we can not do by of box customization.
Plugins are event handlers for the events fired by Microsoft Dynamics CRM.
You can register plug-in against events using Plugin registration tool or using Solutions.
The plug-in runs in CRM server synchronous(in real time) or asynchronously(in the background) depends upon how they are registered with CRM server.
2. When to use the Plugins?
Plugins Vs JavaScript
When Server Side execution of business logic is needed.
Plugins Vs Workflows
Workflows can be used to trigger for a limited number of messages(events). A plugin can be executed for all of the messages of the CRM system and can be synchronous and asynchronous.
When the performance is considered.
Let’s Begin with An Example:
A plug-in is a custom business logic that integrates with Microsoft Dynamics CRM to modify or extend the standard behavior of the platform. Plug-ins act as event handlers and are registered to execute on a particular event in CRM. Plugins are written in either C# or VB and can run either in synchronous or asynchronous mode.
Some scenarios where you would write a plugin are −
You want to execute some business logic such as updating certain fields of a record or updating related records, etc. when you create or update a CRM record.
You want to call an external web service on certain events such as saving or updating a record.
You want to dynamically calculate the field values when any record is opened.
You want to automate processes such as sending e-mails to your customers on certain events in CRM.
Event Framework
The Event Processing Framework in CRM processes the synchronous and asynchronous plugin requests by passing it to the event execution pipeline. Whenever an event triggers a plugin logic, a message is sent to the CRM Organization Web Service where it can be read or modified by other plugins or any core operations of the platform.
Plugin Pipeline Stages
The entire plugin pipeline is divided into multiple stages on which you can register your custom business logic. The pipeline stage specified indicates at which stage of the plugin execution cycle, your plugin code runs. Out of all the specified pipeline stages in the following table, you can register your custom plugins only on Pre- and Post-events. You can’t register plugins on Platform Core Main Operations.
Event
Stage Name
Stage Name
Pre-Event
Pre-validation
Stage in the pipeline for plug-ins that are to execute before the main system operation. Plug-ins registered in this stage may execute outside the database transaction.
Pre-Event
Pre-operation
Stage in the pipeline for plug-ins that are to executed before the main system operation. Plugins registered in this stage are executed within the database transaction.
Platform Core Operation
MainOperation
Intransaction,the main operation of the system, such as create, update, delete, and so on. No custom plug-ins can be registered in this stage. For internal use only.
Post-Event
Post-operation
Stage in the pipeline for plug-ins which are to executed after the main operation. Plug-ins registered in this stage are executed within the database transaction.
Whenever the CRM application invokes an event (like saving or updating a record), the following sequence of actions takes place −
The event triggers a Web service call and the execution is passed through the event pipeline stages (pre-event, platform core operations, post-event).
The information is internally packaged as an OrganizationRequest message and finally sent to the internal CRM Web service methods and platform core operations.
The OrganizationRequest message is first received by pre-event plugins, which can modify the information before passing it to platform core operations. After the platform core operations, the message is packaged as OrganizationResponse and passed to the post-operation plugins. The post operations plugins can optionally modify this information before passing it to the async plugin.
The plugins receive this information in the form of context object that is passed to the Execute method after which the further processing happens.
After all the plugin processing completes, the execution is passed back to the application which triggered the event.
Plugin Messages
Messages are the events on which the plugin (or business logic) is registered. For example, you can register a plugin on Create Message of Contact entity. This would fire the business logic whenever a new Contact record is created.
For custom entities, following are the supported messages based on whether the entity is user-owned or organization-owned.
Message Name
Ownership Type
Assign
User-owned entities only
Create
User-owned and organization-owned entities
Delete
User-owned and organization-owned entities
GrantAccess
User-owned entities only
ModifyAccess
User-owned entities only
Retrieve
User-owned and organization-owned entities
RetrieveMultiple
User-owned and organization-owned entities
RetrievePrincipalAccess
User-owned entities only
RetrieveSharedPrincipalsAndAccess
User-owned entities only
RevokeAccess
User-owned entities only
SetState
User-owned and organization-owned entities
SetStateDynamicEntity
User-owned and organization-owned entities
Update
User-owned and organization-owned entities
For default out-of-the-box entities, there are more than 100 supported messages. Some of these messages are applicable to all the entities while some of them are specific to certain entities. You can find the complete list of supported message in an excel file inside the SDK: SDK\Message-entity support for plug-ins.xlsx
Writing Plugin
In this section, we will learn the basics of writing a plugin. We will be creating a simple plugin that creates a Task activity to follow-up with the customer whenever a new customer is added to the system, i.e. whenever a new Contact record is created in CRM.
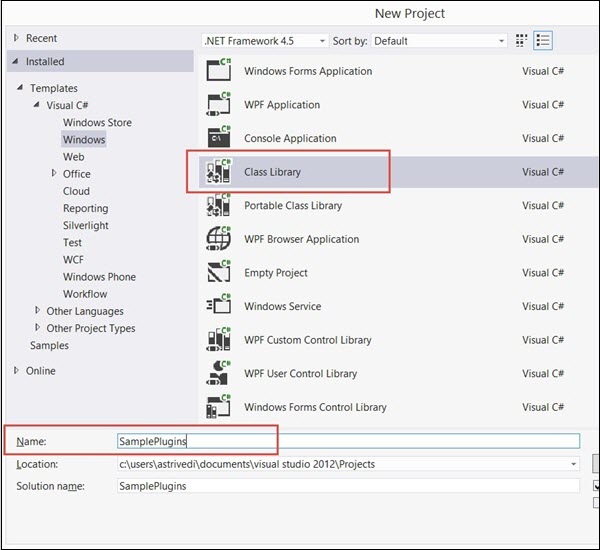
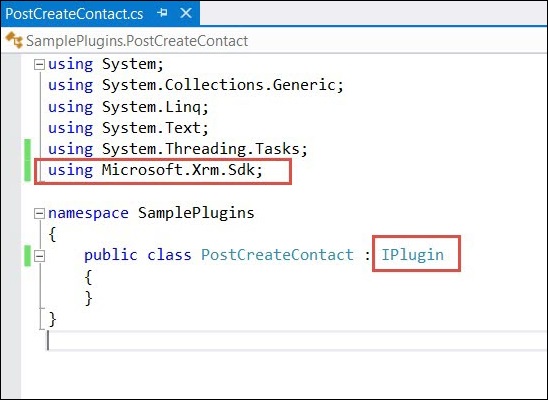
First of all, you would need to include the references to Microsoft.Xrm.Sdknamespace. The CRM SDK contains all the required SDK assemblies. Assuming that you have already downloaded and installed the SDK in Chapter 2, open Visual Studio. Create a new project of type Class Library. You can name the project as SamplePlugins and click OK.
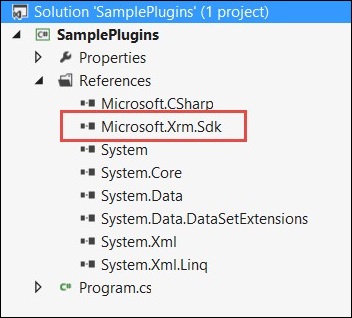
Add the reference of Microsoft.Xrm.Sdk assembly to your project. The assembly is present in SDK/Bin.
Now, create a class named PostCreateContact.cs and extend the class from IPlugin. Till now, your code will look something like the following.
You will also need to add reference to System.Runtime.Serialization. Once you have added the required references, copy the following code inside the PostCreateContact class.
using System;
using System.Collections.Generic;
using System.Linq;
using System.Text;
using System.Threading.Tasks;
using Microsoft.Xrm.Sdk;

namespace SamplePlugins {
   public class PostCreateContact:IPlugin {
      /// A plug-in that creates a follow-up task activity when a new account is created.
      /// Register this plug-in on the Create message, account entity,
      /// and asynchronous mode.

      public void Execute(IServiceProviderserviceProvider) {
         // Obtain the execution context from the service provider.
         IPluginExecutionContext context =(IPluginExecutionContext)
            serviceProvider.GetService(typeof(IPluginExecutionContext));

         // The InputParameters collection contains all the data
            passed in the message request.

         if(context.InputParameters.Contains("Target")&&
            context.InputParameters["Target"]isEntity) {

            // Obtain the target entity from the input parameters.
            Entity entity = (Entity)context.InputParameters["Target"];
            try {

               // Create a task activity to follow up with the account customer in 7 days
               Entity followup = new Entity("task");
               followup["subject"] = "Send e-mail to the new customer.";
               followup["description"] =
                  "Follow up with the customer. Check if there are any new issues
                  that need resolution.";

               followup["scheduledstart"] = DateTime.Now;
               followup["scheduledend"] = DateTime.Now.AddDays(2);
               followup["category"] = context.PrimaryEntityName;

               // Refer to the contact in the task activity.
               if(context.OutputParameters.Contains("id")) {
                  Guid regardingobjectid = new Guid(context.OutputParameter
                     s["id"].ToString());
                  string regardingobjectidType = "contact";
                  followup["regardingobjectid"] =
                     new EntityReference(rega rdingobjectidType,regardingobjectid);
               }

               // Obtain the organization service reference.
               IOrganizationServiceFactory serviceFactory =
                  (IOrganizationSer viceFactory)serviceProvider.GetService
                  (typeof(IOrganizationServiceFactory));
               IOrganizationService service =
                  serviceFactory.CreateOrganizationService(context.UserId);

               // Create the followup activity
               service.Create(followup);
            } catch(Exception ex) {
               throw new InvalidPluginExecutionException(ex.Message);
            }
         }
      }
   }
}
Following is a step-by-step explanation of what this code does −
Step 1 − Implements the Execute method by taking IServiceProvider object as its parameter. The service provider contains references to many useful objects that you are going to use within a plugin.
Step 2 − Obtains the IPluginExecutionContext object using the GetService method of IServiceProvider.
Step 3 − Gets the target entity’s object from the context object’s InputParameters collection. This Entity class object refers to the Contact entity record on which our plugin would be registered.
Step 4 − It then creates an object of Task entity and sets a proper subject, description, dates, category, and regardingobjectid. The regardingobjectid indicates for which contact record this activity record is being created. You can see that the code gets the id of the parent Contact record using context.OutputParameters and associates it with the Task entity record which you have created.
Step 5 − Create an object of IOrganizationServiceFactory using the IServiceProvider object.
Step 6 − Create an object of IOrganizationService using the IOrganizationServiceFactory object.
Step 7 − Finally, using the Create method of this service object. It creates the follow-up activity which gets saved in CRM.
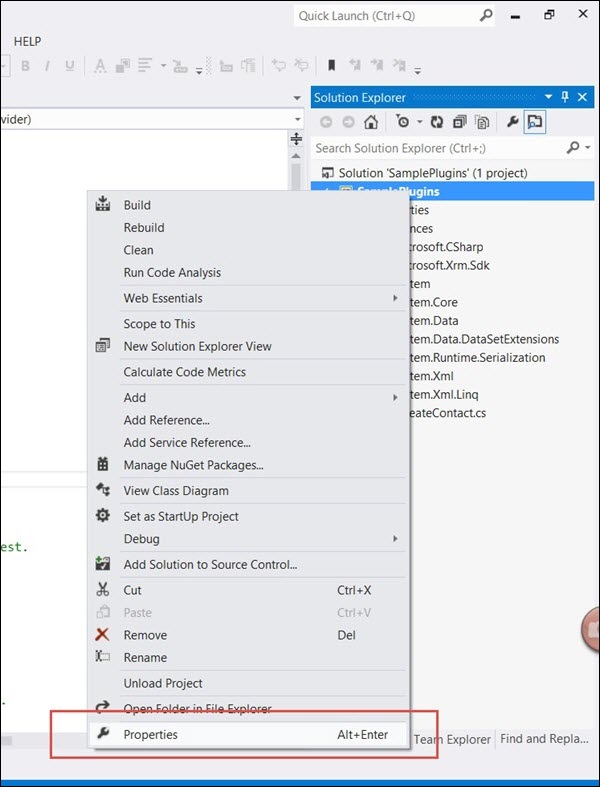
Signing the Plugin Assembly
This section is applicable only if you are registering your plugin assembly for the first time. You need to sign in the assembly with a key to be able to deploy the plugin. Rightclick the solution and click Properties.
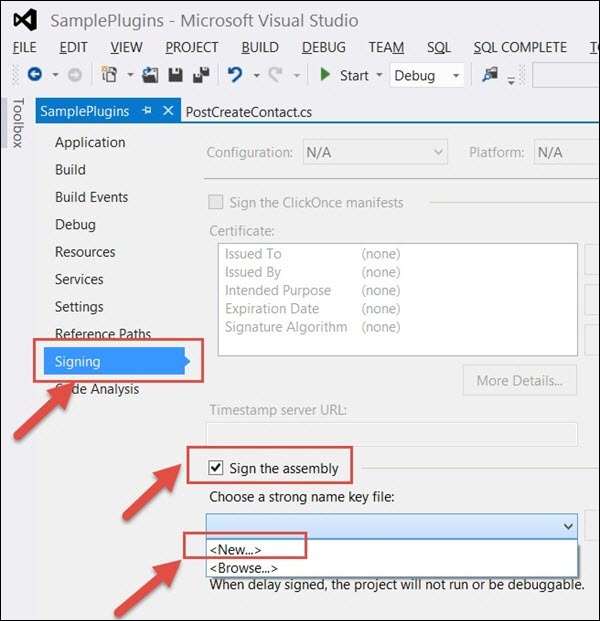
Select the Signing tab from the left options and check the ‘Sign the assembly’ option. Then, select New from Choose a strong name key file option.
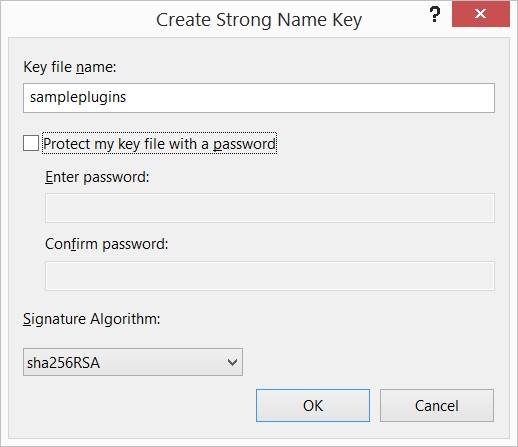
Enter the Key file name as sampleplugins (This can be any other name you want). Uncheck the Protect my key file with a password option and click OK. Click Save.
Finally, build the solution. Right Click → Build. Building the solution will generate assembly DLL, which we will use in the next chapter to register this plugin.
Exception Handling in Plugin
More often than not, your plugin logic will need to handle run-time exceptions. For synchronous plugins, you can return an InvalidPluginExecutionException exception, which will show an error dialog box to the user. The error dialog will contain the custom error message that you pass to the Message object of the exception object.
If you look at our code, we are throwing the InvalidPluginExecutionException exception in our catch block.
throw new InvalidPluginExecutionException(ex.Message);
Conclusion
Plugins are definitely crucial to any custom CRM implementation. In this chapter, we focused on understanding the event framework model, pipeline stages, messages, and writing a sample plugin. In the next chapter, we will register this plugin in CRM and see it working from the end-to-end scenario.
If you are developing a plugin, sooner or later you will need to do something in a plugin that requires “listening” to more than just Create, Read, Update, and Delete messages.
What is a Message?
If you are new to Dynamics CRM development, a Message word that is used to instruct CRM to do something. As far as I can tell, since the early versions of the CRM SDK used the SOAP protocol exclusively, and SOAP passes messages, the term message became the standard name for CRM internal processing options
If anyone has any other explanation, please let me know and I’ll update the post.
What do you do with Messages?
Messages are what a plugin “listens for” to know when to activate and perform whatever job it was programmed to do.
A Message is associated with a Plugin Step ( internally called a SdkMessageProcessingStep ), which is a pointer that associates your plugin code to a Dynamics CRM internal action.
Inside the Plugin Registration Tool, you may see something like this:
As you can see, I have an assembly called ClassLibrary1, within that assembly I have a single plugin, SamplePlugin, and that plugin has two steps:
Create of a queue item
Create an email
Create is the Message.
How do I make it GO?
So, how do you, as a plugin developer, figure out what message you need to use to properly configure your plugin?
Well, for the most part, it’s pretty simple: You select the CRM operation you are interested in intercepting then select Entity that will be associated with that Message.
Here is how the configuration looks within the Plugin Registration Tool:
But what if I don’t know what message to use?
Excellent question, and the reason for my article.
The very fine folks in the Dynamics CRM documentation team have created for us, an Excel worksheet that lists all of the messages associated with a CRM Entity.
After you install the CRM SDK, you’ll find the worksheet here:
sdk\tools\message-entity support for plug-ins.xlsx
And here is how it looks:
It lists the following information:
Message Name
Primary Entity
Secondary Entity
Message Availability
Server or
Both – for Client and Server
Entity Supported Deployment
Server or
Both – for Client and Server
How do I use it?
Usually, I know what Entity I am going to work with so I start there and filter the Primary Entity-based on that information.
Next, I try and locate the Message Name that I might need. Now, this sounds simple, but in certain cases, it’s really hard to determine what exact message you should connect with.
In that case, I will sometimes create steps that monitor each possible message, connect my debugger to IIS, then execute the CRM operation of interest so that I see what message is actually being passed through to my plugin.
You can find the message in the Execution Context’s MessageName property.
Option 2
A second option is to look in the SDK help file itself for topics like:
Email (E-mail) Entity Messages and Methods
Where you will find information like this:
This should be the same (mostly) list of Messages found in the Excel file. Just remove the word “Request” from the end of the Message Name found in the SDK help file and you should have a match.
Conclusion
Well, that’s about it for today. Hopefully, this will help you in your plugin development efforts.